Dave Harding's Boehle (Bailey) Giant Blog
October 2006 - October, 2012
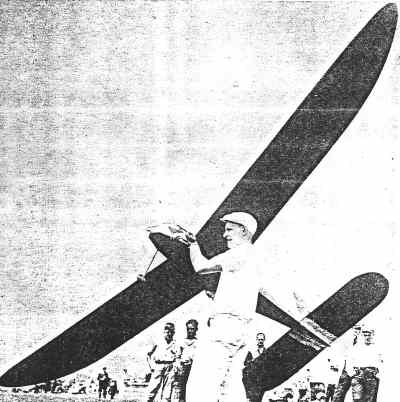
Vernon Boehle with his Giant, 1936
Site Index
Page 1
Project rationale; I want one!
Performance evaluation
Preparations to build Building begins
Fuselage Tail design considerations
Tail construction
Weight estimation
Page 2
Wing spar design
Spar design test
Laser burned rib order
Ribs arrive
Page 3
Engine selection for Classic Texaco event
Forster 99 purchase
Goldberg Valkyrie, a present with the Forster
Wing spar construction
Wing spar joiner construction
Wing spar-joiner structural test
Joiner failure forensics
Joiner redesign and fabrication
Wing spar completion
Wing construction
Page 4
Cabane construction
Covering issues
All-flying tail concerns
Euro break and quickie construction projectPage 5
Covering decisions and weight issues
Vertical tail flutter test
Flying tail control setup
Electric flight test setup
Landing gear installation
CG and control authority concerns
Initial flight tests with naked fuselage
Flight test videos
Weight balance and ballast considerations for various events
Storage box fabrication
Front end configuration and fabrication
Alternate motor/engine installation checks
Electric Texaco propulsion and battery setup
Silk over-covering of the fuselage
Page 6
ETex flight test
Propeller and gearbox issues
Loctite issues of pinion fixing
More flight test videos
Instrumented and video flutter test flight
More propeller refinement
Forster 99 bench tests
Forster ignition setup with Marv Stern’s IGN-SW hardware
Uniflow fuel tank fabrication
Wing incidence and performance issues
2008 Champs
ETexaco flying
ETexaco pinion issue
Forster 99 performance and prop issues
Classic Texaco flights and video
Page 7
End of the 2008 Champs competition
Preparation for 2009 Champs
Addition of an MVVS 61 Diesel for future Euro Texaco and SAM Glow Texaco
Limited Motor Run configuration and testing
2009 Champs Experience; Euphoria and Crash
Champs experiences
The crash
Crash Forensics and Repair
Crash forensics; CSI El Dorado
Consideration of upgrades and improvements
Repairs
Page 8
Preparation for 2010 Euro SAM RC Champs but did not attend
Page 9
2011 SAM Champs
The Beginning October 2007
Well, maybe not a blog, more like a diary as I have started to add new stuff at the bottom. I will figure out a way to add navigation links eventually.
Seeing Glen Poole's 75% Boehle Giant at the 2006 Muncie Champs and hearing World Glider Record Holder, Jack Hiner, say "it is the best flying Old Timer he has ever flown" started me on one of those lusts; I gotta have one! I had been thinking about it for some time. initially because the new-for-2006 electric competition rules allow airplanes of any size to compete on an even basis. Well, even but bigger airplanes fly better and you can see them easier. Glen thought the same thing and decided to build the reduced size version, but I was thinking about a full-sized one. Nobody had a plan or kit that I could find so after the Champs I had a large size plan made and began this journey. But before you go much further you might like to read about the remarkable Vernon Boehle at the AMA website.
Actually the first decisions were associated with transportation. I determined that if I made the fuselage in two pieces, the wing in four and removable stab halves and a removable fin; it might fit in a box 44 x 20 x 20 inches. Not bad; so I launched.
Tuesday 17th October 2006
I hadn't planned to launch into this thing, but you know how it goes; first the plan (Thursday, 12th maybe?). Hey, that’s interesting, how would I do that? Let me see, that airfoil looks interesting, let me scan it and then put it in Profili so I can make the tip ribs and while I am at it, check out the aerodynamics too; Profili will do the calculations at various Reynolds numbers;
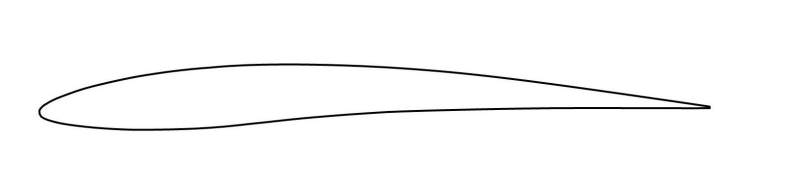
Wow, not bad, Cl of 1.34 at Re 150,000 and look at that drag bucket….all the way out to Cl of 1.0.

I am going to need a bigger building board, so Saturday, 14th, morning I bought a new clean door and some ceiling tiles; hey, I have a plan and the board, what about wood. Hmmm.... Mick was talking about another order from Lone Star,.... how about that; a $157 order on the way, but what do I have on hand? Wow, enough 3/8 sq sticks, let's see if any are strong enough for longerons; seven...not enough, wait there is another. Let's see, I really ought make a permanent miter cutting block for the bandsaw, easy. Now those sticks are heavy enough but what about their relative stiffness? Easy test, clamp them in the vice and measure the deflection from an old Jaguar knock-off nut (my favorite building weight).... hmmm, that’s not too bad, they are different but I can match them.
Yep, better match them and splice them before I loose the data….
Hey, those splices were easy, let them glue overnight. But what about the wing mounting cabane-to-fuselage joint? Run some numbers, yep, some aluminum uprights but what about the uprights-to-fuselage joint? Balsa is not strong enough, why don’t I just saw out a 3/8 square pine strip? Yikes, it weighs an ounce, better cut some more splices so I can have pine at the bolt holes and balsa everywhere else. That was easy…
Cut the plan and tape it down. Wow, it hangs over the end! Make some sketches of the details of wing mounting, fuselage joint, frames (who would use acres of plywood anyway?) Need some form of pin/clamp wow, that 3/4 inch square pine I bought at the lumber yard along with the door and the 1 1/2 inch brads should work. Wow, I made a couple of dozen or so, isn't that bandsaw marvelous?
Hey, I have the longerons laid out and clamped
Monday 16th.
Well, I suppose it wouldn't hurt to cut and glue some verticals.... yikes, I have finished the whole thing! Just look how pretty that pine to balsa splice is.
And the primary frames too; are they square, yep, good enough. This is a great way to make frames; keeps ‘em square and the grain is running in the right direction.
Let's just peal it off the plan and have a look. Wow, only nine ounces so far against my estimate of 25 complete; not bad. Just have to sand off the surfaces on both sides before separating the two sides. But sanding is kinda noisy at midnight and the sounds from the basement shop percolate up the ducting to the bedroom and Jean has been asleep for a couple of hours; time to take a picture and go to bed myself!
Six am Tuesday, and Jean is still asleep and will be for an hour or so yet; can't finish the sanding job yet.
Thinking about sawing out the ribs when the wood arrives, but that won’t be till next week; what will I do with myself? Hmmmmm… I do have enough wood for the stab and I could finish the fuselage and landing gear and maybe the controls… wait, I need some good servos, better order them right away.
Yikes, I am supposed to be painting the six new doors we are having installed in a couple of weeks…what am I doing with all this model building.
Is this called a blog?
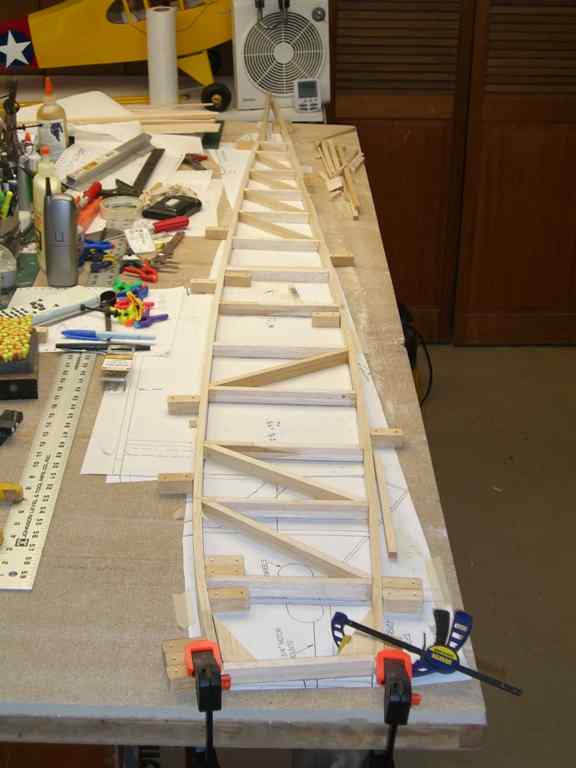
Ok, sides sanded and separated then sanded on the insides too. I have taken to building over the plans with no protective cover. Since I mostly use wood glue the wood sticks to the plan and I have to sand it off the lower surface side of the structure. Plan gets kinda messed up, but I don't usually build two of the same identical thing anyway. I save the plans and can re-trace them if necessary.
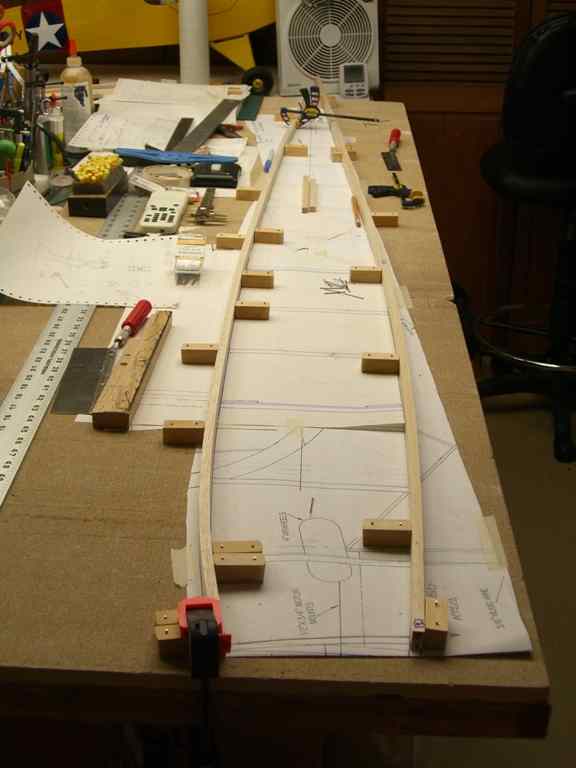
Alright, time to put the sides together. First to the frames and the few laterals between them, then pull in the tail end and align it. Add some more laterals keeping track of alignment. Pull in the nose to the thin ply former but don't glue it yet as there are details to be cut and added (who needs thick ply formers? I will reinforce this one just where necessary)
Now add the details for the fuselage joint. I plan to have four 1/4 inch nylon bolts through aligning tubes running through 1/8 inch ply tongues at each longeron location. Make the structure first, fit the bolts and tubes then cut the longerons in two.

Let's see just how big this sucker is;
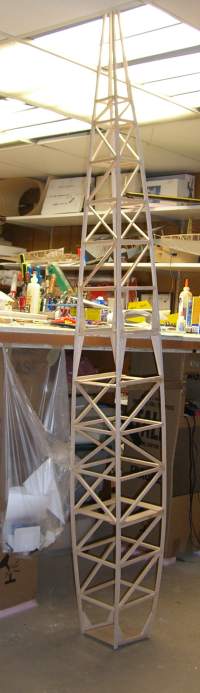
Wow, I can't stand it up without poking through the ceiling!
Let's see what it weighs now; 14.4 oz, right on target for the 25 ounce goal.

Wednesday 18th Wait, what am I doing at this computer? Jean is up and I need to cut the fuselage joint ply parts....
Thursday 19th October
You know how it is, the initial framework goes easy, but the devil is in the details and it has taken a while to make and install all the elements of the fuselage-joint and the rest of the diagonals. The joint is now complete but I will wait till the fuselage is just about complete before I cut the longerons. I have made all the detail beef-ups around the cabane mounting area; I don't want to tear the fuselage apart if I touch a wing tip on landing! Especially the tip of a 14 foot wing! Weight is up to 18 ounces.
Now I am working on the details at the tail end and front end. The stab will be all-flying for both vertical and horizontal. I will make receiver bearing assemblies within the aft fuselage such that the stab elements plug into them. The vertical will include a tubular stub sub-spar that will plug into a vertical tubular receiver that is connected internally to the rudder servo. The horizontal two-piece stab parts will slip over a removable tubular spar that slips into the horizontal bearings in the aft fuselage. The horizontal halves will slip onto the spar and then fastened to it by screws; effectively holding it in place and fixing the two halves together in pitch. At the 25% chord point there will be another tubular sub-spar, this one also removable and trapped between the two halves. Pitch control will be via this tube which will pass through a cam installed on the elevator servo. The servos will be mounted in the tail area between the stab halves. There will be an access hatch on top.
Well, I will show it to you in a little while. Now I am off to the hobby store to buy some large diameter brass tubing from which I will make this stuff. Meanwhile, this is the way progress looks;
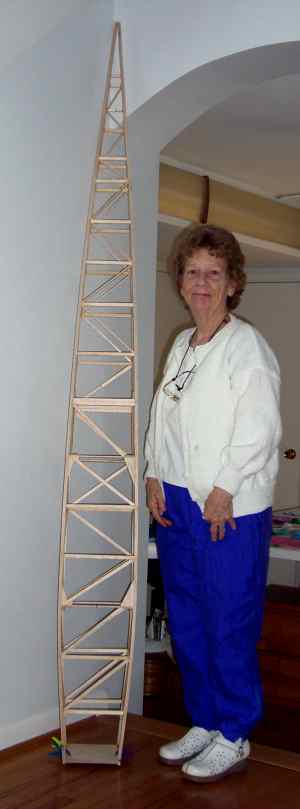
Big eh? Anyone know how tall Jean is? |
Horizontal stab pivot sub-spar installed straight and true (I hope). Vertical stab pivot and control horn installed, although a bit stiff. I will lap it in with a dowel and some grinding compound, just like we used to for car engine valves. I bought some servos from the local hobby store yesterday but I am a bit worried about just how strong I they should be. I don't expect the flight loads to be excessive as I mounted the pivots at the quarter chord point, but the surfaces are big and I am worried about the handling loads feeding back to the gear train and causing undetectable harm. Well, undetectable until you lose control!.
The torsional stiffness of the back end seems adequate even without the upper surface structure; should be ok.
Connections?
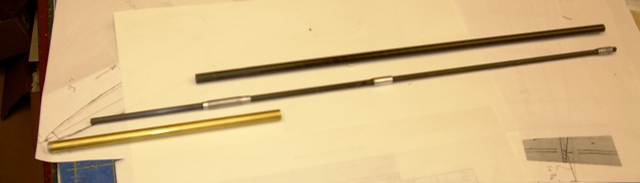
The graphite tube will be used as the stab sub-spar. It was given to me by one of Rutan's employees when I left there ten years ago. He said, "here Dave, you might find a use for this one day". A neat connection with the past; recent and distant.
Remember, Vernon Boehle became a Spitfire pilot in WWII. He probably flew right over our house in the Surrey Docks during the Blitz. |
Thursday 26th October
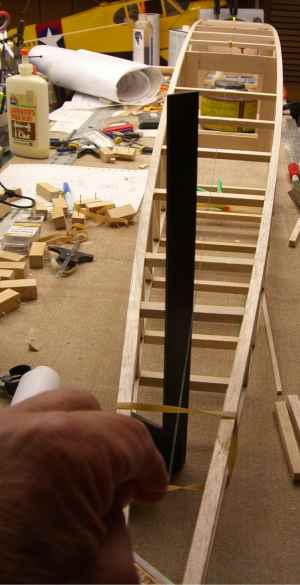
Spent the week finishing the fuselage including the tail controls; making them smooth to operate, making the engine/motor mount and fairing, adding landing gear mounts and making the screw in part of the fuselage two-piece joint. Sheeted in the aft end and added the mounting for the tail skid. With an all flying tail the 18 inch chord horizontal has to be kept out of the grass. In fact I am becoming quite conserned about the handling and landing loads on the servos. I bought some servos but I think I will buy some extra strong types, like the new Hitec with metal and reinforced plastic gears. It all takes much more time than laying out the basic framework. Weight is now up to 27.5 ounces, a little over weight.
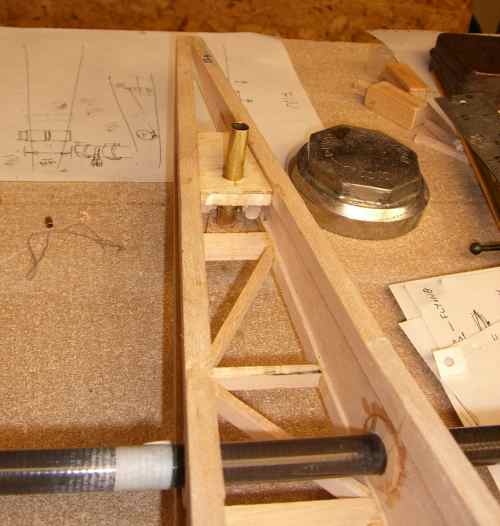
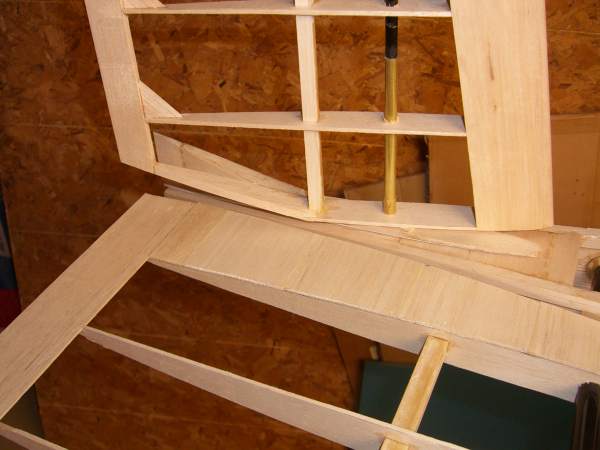
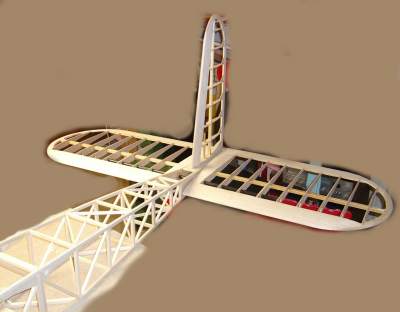
Next came the vertical tail and its pivot spar. This has to take all the bending loads into the rear fuselage socket. I had a nice graphite tube which seemed ideal but then; horrors, I remembered the flutter problem. You see the vertical tail is quite tall and the rear fuselage quite small. This leads to concerns about the bending stiffness of the vertical tail mounted on the fuselage. Then there is the concern about the stiffness of the control loop from pivot through control horns to the servo itself. If these are somewhat soft they can play together to allow flutter at high speeds, well, hopefully high speeds, indeed speeds outside the flight envelope. But once I put it together it seemed somewhat softer than I had hoped so I elected to double up the pivot spar with another graphite tube within the basic tube. Of course I had to find a stack of tubes that would allow the two to fit closely together. Naturally the tubes didn't fit so I had to assemble them onto the inner tube then machine them to fit into the outer!
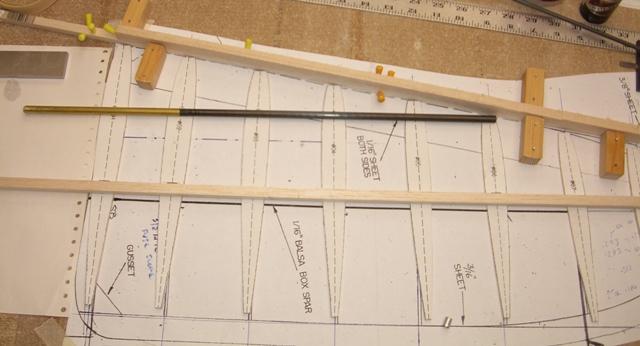
Then it was time to cut the ribs and fit the two spars; graphite pivot and 3/8 square main spar. I added a layer of fiberglass uni to two sides of the balsa spar to add more stiffness, but having built up the whole structure and glued it together I realized I had installed the spar with the re-inforcement on the wrong sides. Now it is stiff chordwise!
Here are the parts before gluing together;
 And here is the final assembly of the tail in its right place. It feels much stiffer now. But I am still worried about the whole approach of flying stabs on this model. The Fin is very tall and the horizontal stab is huge with an 18 inch chord. Trouble is, if it doesn't work I won't get the chance to fix it as the failure mode will be catastrophic, so I had better get it right from the start.
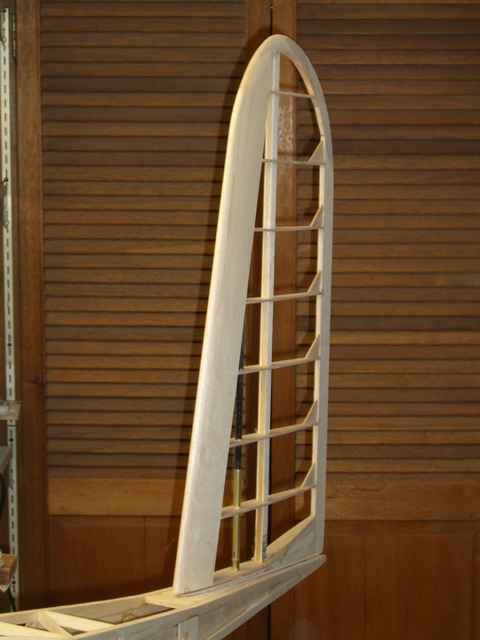
The vertical weighs almot three ounces with that heavy spar.
Now to cut the ribs for the horizontal. I have finished twelve for the right hand side and should get most of it done tomorrow.
Oh, yes, I did get the order of wood from Lone Star so I have no excuse for not cutting the wing ribs, although I will make the main spars first as I must cut the ribs to fit.
Monday 30th October.
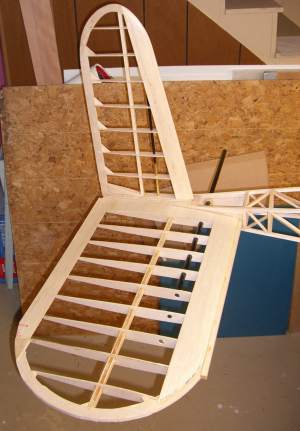 It looks like the horizontal stab will weigh about the predicted value of 12 ounces, based on weighing the one almost finished side plus the graphite pivot spar. Here is a trial assembly. Oops, looks like I have not provided enough control throw relative to fin/horizontal travel interference. I can get about five degrees nose-up trim on the stab. Haven't looked at flying stab pitch range requirements yet, but with the huge stab on the Giant I would think that Cl of 0.5 achieved at 5 degrees should be plenty. And at that point I have unlimited vertical fin travel.
Here is the current weight and balance data.
|
Model |
Boehle's Giant E Texaco |
|
|
|
|
|
lb |
|
|
|
|
|
|
|
|
|
CG inches |
9.03 |
|
|
|
Chord inches |
18 |
|
|
|
|
* from LE |
CG % |
0.50 |
|
|
|
Target CG in. aft. of wing LE. |
9 |
|
|
|
|
|
Weight |
186.2 |
11.64 |
|
|
Wing Area ~ sq inches |
2853 |
|
|
|
|
|
Wing Loading |
9.4 |
|
|
|
|
|
|
|
|
|
|
Weight at 8 oz |
158.5 |
9.91 |
|
|
|
|
|
|
|
|
|
|
|
|
|
|
|
|
|
Weight |
% w/o ballast |
|
Location* |
Moment |
|
|
Comments |
| Airframe |
|
|
|
|
|
|
|
|
|
|
|
Fuselage |
|
|
30 |
16% |
|
11 |
330.00 |
18 |
|
Inc fairings w/o motor |
|
Cabane |
|
|
4 |
2% |
|
7 |
28.00 |
|
|
|
|
Wing |
|
|
66 |
35% |
|
8 |
528.00 |
14 |
|
|
|
Empenage Horizontal |
|
|
12 |
6% |
|
61.18 |
734.16 |
2.9 |
|
|
|
Empenage Vertical |
|
|
3 |
2% |
|
66.5 |
199.50 |
|
|
|
|
L/G |
|
|
5 |
3% |
|
-7 |
-35.00 |
|
|
|
|
|
|
|
|
0% |
|
|
0.00 |
|
|
|
|
|
|
|
|
0% |
|
|
0.00 |
|
|
|
|
|
|
Airframe Sub total. |
|
0% |
120 |
|
|
|
|
|
| Propulsion |
|
|
|
0% |
|
|
0.00 |
|
|
|
|
Motor |
|
|
3 |
2% |
|
-20 |
-60.00 |
13.5 |
|
Mega 16/15/3 |
|
Gearbox |
|
|
3 |
2% |
|
-20 |
-60.00 |
|
|
special gearbox |
|
Prop |
|
|
3 |
2% |
|
-20 |
-60.00 |
|
|
Home made 24 x 20 |
|
|
|
|
|
0% |
|
|
0.00 |
|
|
|
|
|
|
|
|
0% |
|
|
0.00 |
|
|
|
|
Power Battery |
One pack |
|
15 |
8% |
|
15 |
225.00 |
Allowable Batt Wt. |
46.55 |
14 x 3 = 42 1500 AUL cells
Could add as weight empty increases |
|
|
Two packs |
|
30 |
16% |
|
-15 |
-450.00 |
|
|
Packs separated to accomodate CG placement and ballast/heavy item structural provisions |
|
Propulsion wiring |
|
|
1 |
1% |
|
-1 |
-1.00 |
|
|
|
|
ESC |
|
|
2 |
1% |
|
0 |
0.00 |
|
|
|
|
|
|
|
0 |
0% |
|
-2 |
0.00 |
|
|
|
|
|
|
Propulsion Sub total. |
|
0% |
57 |
|
|
|
|
|
| Systems |
|
|
|
0% |
|
|
0.00 |
|
|
|
|
Radio, Rx bat voltage reg |
|
4.2 |
2% |
|
9 |
37.80 |
|
|
FMA M5 |
|
Wiring |
|
|
2 |
1% |
|
30 |
60.00 |
|
|
2 cell LiPoly |
|
|
|
|
|
0% |
|
|
0.00 |
|
|
|
|
|
|
|
|
0% |
|
|
0.00 |
|
|
|
|
|
|
|
|
0% |
|
|
0.00 |
|
|
|
|
Servos |
|
|
3 |
2% |
|
68 |
204.00 |
|
|
2 x HS 85? |
|
|
|
|
|
0% |
|
|
0.00 |
|
|
|
|
|
|
|
|
0% |
|
|
0.00 |
|
|
|
|
|
|
|
|
0% |
|
|
0.00 |
|
|
|
|
|
|
|
|
0% |
|
|
|
|
|
|
|
|
|
Systems Sub total. |
|
0% |
9.2 |
|
|
|
|
|
| Ballast |
|
|
0 |
0% |
|
0 |
0.00 |
|
|
|
|
|
|
Total Weight |
186.2 |
100% |
186 |
|
1680.46 |
|
|
|
|
|
|
|
|
|
|
|
|
|
|
|
|
|
|
|
|
|
|
|
CG inches |
9.03 |
|
|
|
|
|
|
|
|
|
|
CG % |
0.50 |
|
|
Still mulling the issues with the vertical tail.
I am worried about the whole thing in terms of; will it flutter; will the control be strong enough and should I / could I add redundancy. The pitch control mechanism is a servo, a strong and stiff one when I get around to selecting it, with a control horn. The servo horn will have only about ½ inch arm to match the arm on the pivot and give the correct control throw. This pivot arm, which is already made and in place, is limited in length by clearance to the fuselage sides. Did I mention that the controls for the all-flying tail will be hidden within the aft fuselage?
The fin is mounted via the graphite/brass tube spar, fixed into another brass tube, which in turn pivots in yet another pair of brass tube bushings fastened in the aft fuselage top and bottom sheeting. Whew! Don’t you love those K&S nesting brass tubes? All of this is to make the fin removable for transportation; it is something like 24 inches high. So, the fuselage contains a pair of bushings and another tube within them, all fixed in place by a control horn; the kind the RC guys use on strip ailerons;
Aw hell, here is a sketch of all this.
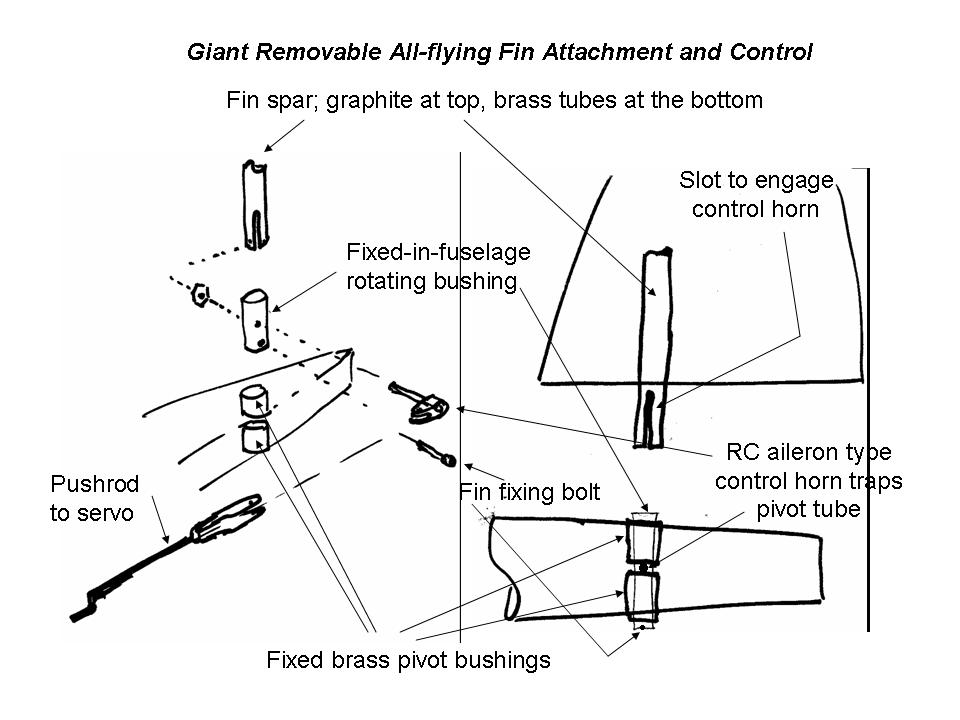
So the initial concern is the strength of the slotted tube at the bottom end of the fin spar. It is a 3/8 inch brass tube slotted for a 6-32 bolt; 0.157 inch diameter. Now if the joint fails it can be a clean break; unlikely, but if it did the fin could depart upwards. Or it could just sit there and feather; eliminating any stabilizing force and, of course, providing no control. If it binds on failure it will still provide stability but no control, and trim undetermined.
Therefore, the idea of driving a separate, redundant control of a servo tab, would not be effective under most of these circumstances. Indeed, if it were set up as a servo tab to protect against a control “open” failure, it would have the opposite control sense for a jammed fin pivot! Although you could deal with that to just steer the model.
Oh well, maybe I am unduly worrying, and this stuff is all built!
Dave, back to the building board after several weekend diversions.
Tuesday 31st October
Finished the tail structure today;
Page 1 / Page 2 / page 3 / Page 4 / Page 5 / Page 6 / Page 7 / Page 8 / Page 9
Top